Rumba Board - Dead atmega16u2 (USB) fix
Way back in 2013 I bought a Rumba board for my 3DR printer build. Unfortunately it had a bit if an issue with the USB chip and so the unreliable USB connectivity made it practically unusable. As far as I recall I could never even get a program loaded up, so it's been sitting in the original box that it shipped in ever since. Cue 2019 and I've been putting together an MPCNC for a project and decided that I'd really like to get the Rumba board up and running so that I can take advantage of the six stepper drivers it has.
Back in 2013, for whatever reason I never bothered to try and fix the issue with the Rumba board, and so it sat on the shelf unloved and unused. I think I managed to get as far as realising that I was not alone with Rumba USB issues as others were experiencing the same problem as me. Unfortunately, whilst there was some comraderie in shared pain, no one had any answers for me as not only was my Rumba board broken, but I also used a Mac, which meant that there was zero pooled experience to draw upon. I was on my own. And so the net result was that it probably went into the too hard basket to wait for another day. Well it's reprieve came this week when I decided to take a look at trying to revive it.
I ordered a USBasp programming interface so that I could re-flash the firmware in the USB controller. The USB comms is handled by an atmega16u2, which can be re-flashed if required. The process is not super difficult but existing online tutorials do not explain things too well.
You'll need a six pin connector for your USBasp programmer to mate with the ICSP header on the Rumba. If, like me your USBasp lead comes with a 10 pin plug you can easily make a temporary adaptor from some male / female jumper wires using the following pin outs
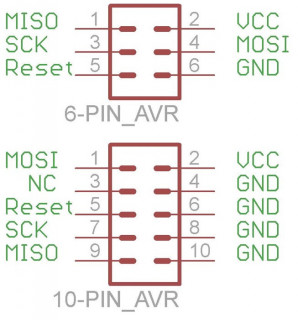
With the lead made up you can plug it into the Rumba board in the ICSP header nearest to the USB port. It's worth noting that the MISO pin (pin 1) is nearest to the USB port
Most of the online tutorials state that you must use a program called 'dfu-programmer' which is available on all platforms. I tried to use this and could not get it to work. In fact I could not even get it to recognise that it had a device plugged into it. So best to just ignore dfu-programmer all together.
Instead I used avrdude. There's a version of this that's used by the Arduino IDE, but you'll need the command line version, which means installing it. For me (on a mac) I installed it via homebrew with the command brew install avrdude
I also installed lsusb which allows you to easily view connected USB devices using the following command brew update && brew tap jlhonora/lsusb && brew install lsusb
To reflash the atmega16u2 you need to download the hex file from the RepRap site - https://reprap.org/wiki/File:RRD-RUMBA_ATmega16U2_USB2Serial.hex.zip Unzip it and then open the directory in a terminal window.
I found that there's no need to put the chip into any kind of loader mode, simply issue the following command and it will upload the hex file to the chip
udo avrdude -c usbasp -p m16u2 -F -U flash:r:RRD-RUMBA_ATmega16U2_USB2Serial.hex:i
Where RRD-RUMBA_ATmega16U2_USB2Serial.hex is the name of the hex file you downloaded
You will then see some progress indicators in the terminal and a success message when the job is done
But does it work?
Unfortunately whilst uploading the firmware to my chip was actually successful, I did not regain USB functionality. I figured that there must be some other issue with the chip or board. Quite probably it's the clock crystal or maybe some other design problem. So, back to the drawing board I went, as they say.
I figured that whilst I could not use the USB port, if I could upload the sketch to the board then at least I should be able to use the SD card reader in the display to transfer files. I used this method for many years on my 3DR printer as the USB was so flakey (another marginally better Rumba Board), plus then it would also be impervious to issues related to being tethered to a computer, so a win-win really.
I initially tried to figure out how to use the CLI version of avrdude to upload a compiled sketch but then realised that I should be able to upload via the Arduino IDE. It ended up actually being very simple.
The programming lead needs to be connected to the ICSP header adjacent to the Stepper driver for Axis X. The Arrow shown by the silk screen points to the MISO pin, you also need to completely remove the USB / Stand-alone power jumper as leaving this in place prevents the transfer from working.
Next, in the arduino IDE you need to change the settings for 'Tools > Programmer' to 'USBasp'
Then once you've set your board and processor settings to 'Mega2560', go to the 'Sketch menu and select 'Upload Using Programmer'. The sketch will then compile and upload.
Power-off and remove the programmer and then replace the power jumper and power up your board to see the 'Marlin' splash screen.
Assuming you have set up a screen and SD Card interface you can now use your Rumba without needing the USB port.
But what if you hate SD cards?
If, like me you're using your Rumba for a CNC, or your workflow just doesn't work with having to use an SD card then you will need to find out a way to get serial comms to the board. Fortunately they have made this pretty easy on the board that I had by providing a serial header connection. This is the row of four pins adjacent to the USB port (or heater MOSFET on my earlier board). This header is labelled TX / RX / GND / +5V. It is the same pin configuration used on the common bluetooth serial adaptors that you can buy from ebay like the HC-05 or HC-06. So after a little soldering to change the pins on my HC-06 to pin-sockets, I plugged the adaptor in and connected to it from my computer.
After pairing with the device, I then opened up CNCjs and selected the new bluetooth serial port from the drop down list and hit open connection. Hey-presto. I can now communicate with my MPCNC from my Macbook Via bluetooth. You could also use a USB serial programmer to do the same and regain a physical USB connection should you wish.
Conclusion
So, whilst I don't have a working physical USB connection on my board, I'm pretty confident that I will be able to use the machine without it. Unfortunately CNCjs does not seem to have a method by which I can transfer direct to the SD card via the CNCjs interface, which for me would be perfect, but that is easy enough to live without. I'm very happy that I can use CNCjs to jog and set up the machine or simply run GCode from the SD card. Bluetooth is a bonus.
One caveat is that it does not appear to be possible to upload a sketch via the bluetooth board / serial header. This is most likely an issue related to the hardware reset signal required to put the chip into bootloader mode. There's probably workarounds for this (I tried the reset button flick trick but to no avail) but for the reality is that there's probably little need for this functionality when it is so simple to upload via the ICSP header.
I hope that this info helps someone out.