THIR DIY Open Source Automatic Aquarium Roll Filter
THIR Aquarium Roll Filter
(That’s How I Roll)
Open Source Aquarium Roll Filter
THIR is a build it yourself roll-filter for your aquarium.
About the THIR project
Automatic roll filters are generally very expensive to buy and maintain despite the cost of materials and construction techniques being relatively cheap and easy to undertake. The idea of THIR is to design and make available plans for an automatic roll filter that anyone can put together at home as well as help people source affordable filter material to use in their filters.
What is the benefit of a roll filter
Traditional mechanical filtration usually consists of exchangeable filter socks or disposable filter media. Maintaining either type of filtration is relatively labour intensive and requires frequent ongoing attention. Using a roll filter does away with the need for frequent filter media changes, and also allows finer filtration media to be used. The mean-time-between filtration servicing is generally in the order of several weeks with a roll filter, compared to just a number days with traditional filtration. This free’s up the aquarists time to do other more meaningful things such as learning ballet or bar skittles.
How do Roll Filters work?
Automatic roll filters use a long strip of filter media wound onto a roll, much like a toilet or kitchen roll. A length of media is unwound from the roll and water is passed through it. Particulates and waste become trapped in the fibres of the media, leaving cleaned filtered water to pass through. When the media becomes blocked the water rises triggering a float switch which then moves the roll moving clean media to the water flow once again. Used media is wound onto a waste roll where it is stored until disposal.
Why do we need yet another roll filter design?
There are many examples of roll filters now on the market, with a variety of designs, some good, some bad.
Having been an early adopter of roll filters I discovered that there were lots of improvements that needed to be made to the unit I purchased before it could really be considered reliable. In fact I ended up redesigning pretty much all of it.
It was whilst I was on this journey of repair and rebuild that I realised that paying several hundred dollars for a few dollars worth of perspex, an inferior design and a cheap $2 motor was an absolute travesty. Especially when I did not even manage to get to the end of the first filter roll before the machine broke. So I had the idea of making an improved roll filter and selling it.
Fast forwards two years and I still haven’t gotten around to making roll filters as I am too damn busy. So I thought that perhaps instead of selling filters, I should simply give the design away for free and allow others to make their own and build on the work I have already done.
Basic design constraints
- The design is a simple clear perspex box with an open top.
- There are perches on the top of the box to hold a filter roll and waste roll.
- Media is transported from the media roll to the waste roll by driving the waste roll
- The media is passed around removable rollers at the bottom of the box so that the media is presented against the inside faces of the box
- Rollers are removable to aid with roll change
- There are holes in the faces of the box to allow water to pass through the media and out of the box
- The waste roller is driven by a 2 or 3 rpm motor and gearbox.
- The motor is operated by a simple float switch
- Design should be scalable so that it can be made larger / smaller to suit different tanks / flow rates
- Design should be easily removable / dismantle-able to aid cleaning and roll changes
- Design should be easy to assemble and very importantly easy to get square!!!
Roll filter media
One of the biggest complaints about roll filters is the cost of the media. I have been running weed matting in my machine for about the past year with no issues. Weed matting comes on a 900/1000mm wide roll. I simply cut the roll into appropriately size smaller rolls which fit into my machine. I tried a variety of different materials including ‘interfacing’ commonly used by dressmakers and quilters as well as other non-woven fibers.
You may need to experiment a little to find a suitable local source. I found that getting a sample of the material and then doing a simple ‘tap test’ was enough to determine how well the material flowed water. Some materials did not pass water at all and the water simply rolled off. This was especially true of some of the ‘interfacing’ fabrics which contained a heat activated glue. These were obviously no good.
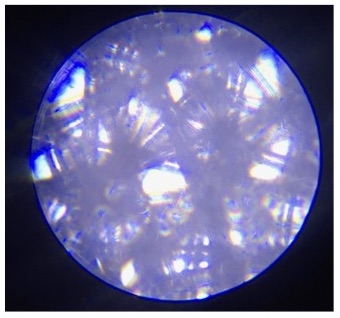
I also analysed the fabric under a microscope to determine the size of the holes. Being a non-woven fabric the holes are irregularly sized so you need to do some a bit of mathematics and average out the sizes. This is not an exact science, but then I expect that most of what is sold comprises of 90% marketing waffle and 10% fact.
TIP: If you want to have a go at measuring the holes, you can easily make a guide from a human hair. The average hair is about 60 microns wide.
I found that that a 10 micron filter roll was almost too small, especially when used on a small unit like I’m using (3000l/h), The filter roll ended up consumed very quickly, in fact when I initially tried it my water was obviously too dirty and the filter box simply overflowed as if the media was not passing anything. Smaller weave filter media requires very large filter boxes and wide filter rolls to get the flow required so make this a factor when building your box.
The ‘weed matting’ material I use is just a generic non-woven material sold as ‘weed matting’ It was available in white and also a dark grey colour. I elected to use the white so that the residue was easier to see. Under the microscope I noted that the material had holes as large as 60 microns, but that most of the holes were much smaller. This worked really well on my machine and did not result with the roll getting consumed to quickly.
Of course YMMV and you will probably have no way of testing the effectiveness of any filter media you find until you build a filter box. So for this reason I recommend that you build a ‘standard’ width box. That is a box that will use off-of the shelf filter media. It’s also a good idea to buy at least one roll of standard filter media so that you can get up and running straight away. This way you will also know what to expect performance-wise.
How to make the THIR filter.
A list of the parts you need is provided in the bill of materials This lists everything that you need to build a functional THIR filter.
Feel free to modify, hack or otherwise substitute parts as you see fit. If you do make improvements, please share your changes here so that others may benefit by submitting a pull request.
The filter box
The filter box is made of laser cut perspex. You should be able to get the parts cut locally at any laser cutting service. You may also be able to get them cut at your local makerspace or hackerspace if they have a laser cutter. The designs are contained in the DXF files found in the ‘Drawings’ folder - these are the files that contain the information needed to cut the perspex parts that you need.
All components slot together with castellated joints. This ensures that the filter box is square. The squareness of the box is VERY important as if it is not perfectly square your rollers will not be aligned and the filter media will have a tendency to ‘track’ to one side.
There are several holes in the box that need to be tapped for M5 plastic screws. These include the bottom roller fixings, the hanging bracket fixing, the drive roller mounts and the float switch mount. If you see a hole, tap it. Tapping the holes is easiest done before you glue everything together.
It’s a good idea to do a trial assembly of the parts. This way you will ensure that they all fit together as well as learning where each part fits. If you need to adjust the size a little, a small length of wood with some fine sandpaper can be used to gently file the edges.
When you are ready you can glue the parts together using super-glue or other appropriate glue. Just make sure all of the parts are clean before glueing. You should not need to clamp the parts together, they should hold in place even without using glue.
When the filter box has been glued, set it aside somewhere safe so that it does not get disturbed whilst the glue sets.
Drive motor
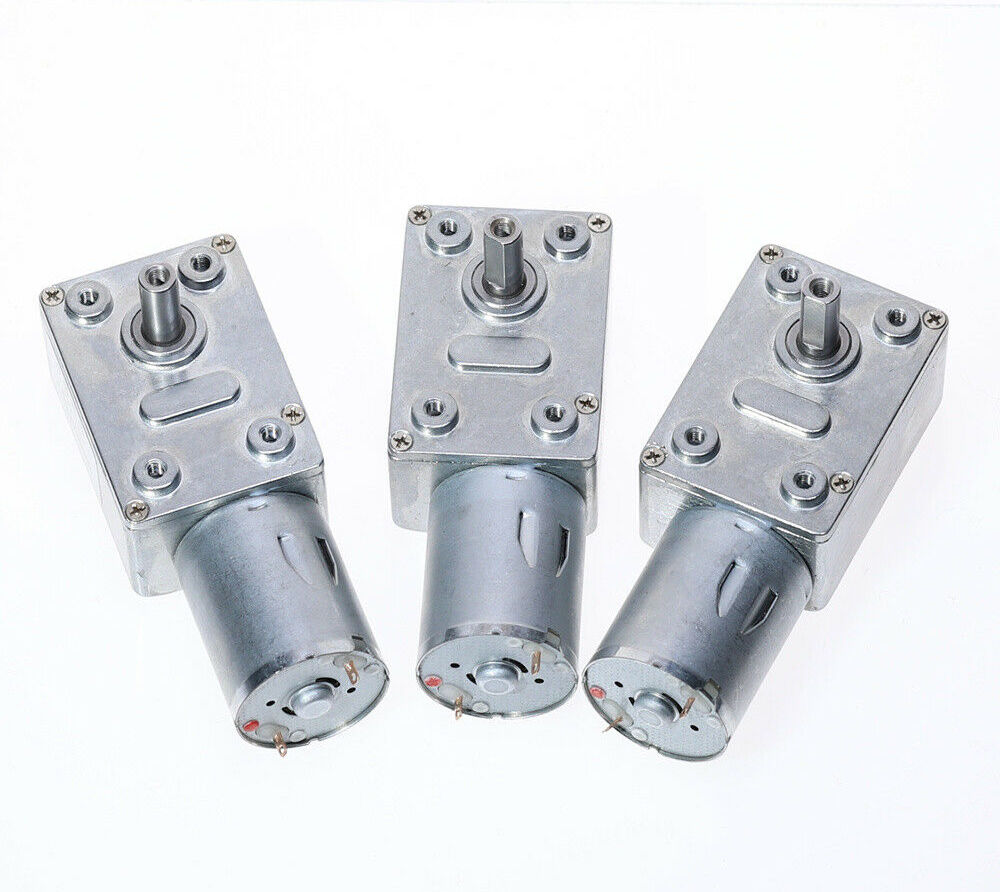
The drive motor is a regular 2rpm 12Vdc worm geared motor with metal gearbox. Mounting holes are pre-cut in the box sides. The motor should be mounted with stainless steel M3 screws
The motor has a 6mm shaft with an M1x17 tooth nylon drive spigot fitted
The float switch is connected in series with the motor and PSU so that when the float switch is active the motor turns.
I recommend a 12Vdc plug top PSU. 0.5A should be plenty, these motors normally only draw about 0.1amps but will draw more when they are loaded up a little.
Make sure that you waterproof all connections with heat shrink. You can also use a large diameter heat shrink over the motor to waterproof the motor connections. There’s no hard and fast rules on how to water-proof the motor, just use what you can.
Waste filter roll
Possibly the hardest part of the build is making the waste roller. The M1 48 tooth gear has to be glued in the correct position. The roller also has to be the correct width to fit in the filter box. Trial fit the roller and gear before gluing.
Using the filter roller.
Installing filter roll
Installing the filter roll for the first time is pretty simple.
- Install the filter roll ensuring that the roll unwinds to the bottom.
- Pull a length of filter material from the roll
- Fold the end of the roll over and back on itself aligning the edges of the roll. This ensures a straight edge.
- Using a length of tape fix the end of the roll to the bottom of the waste roller
- Plug the unit in an operate the float switch to roll filter material around the waste roller
- Push the loop of filter material downwards into the filter box
- Install the two lower rollers
- Unplug unit
- Hang unit on side of tank / refuge / etc
- Adjust mounting bracket until the bottom of the unit is submerged.
- Adjust tension on filter material by rolling back excess material on to filter roll.
- Route the return from your display tank into the top of the filter box.
- NOTE: using a flexible silicon hose will allow easy removal for cleaning
- NOTE: fit a mesh / gauze / snail filter to the bottom of the return to stop snails entering the filter roll.
- Plug unit back in - you are good to go.
Changing filter rolls
The quick method
- Unroll end of old filter roll.
- Overlap new filter media and old filter media making sure the roll is in the correct orientation.
- Staple both media together.
- Carefully draw the new media through the filter by manually pulling the old filter media
- When join has passed through machine, remove old filter roll, discard waste media and affix new media to roll using tape as before
The long method
- Unplug the power
- Remove the unit from tank / refuge / etc
- Remove disused media
- You’ve got it out of the tank, might as well give it a clean.
- Follow installation instructions to reinstall.